Friday, April 27, 2018

Basic items for making Montessori Materials

Hopefully most teachers are lucky enough to have some of these tools available at school, though personally I never could find the time to actually work on projects at school and ended up taking them home anyways. Here’s my suggestions for some items that have made it easier to make quality materials at home.
  • Computer and printer
    • Basically essential! Use to make any type of card or book materials.
  • Cardstock and/or scrapbook paper
    • I was gifted a bunch of old scrapbook paper by an aunt and used it to make fun color coded card sets. Put out feels to your family/friends to see if they have any extra laying around.
  • Sewing machine
    • I grew up with a mother who sewed all my Halloween costumes, so I feel like I had a jump start on this during training. Most materials can be sewn by hand but I think it’s totally worth it to learn how to use a sewing machine to help speed things up and overall make a sturdier product. If you can find someone with an old serger machine they’re willing to part with this makes for even faster sewing on a lot of things.
  • Laminator
    • Not necessary for those just making materials for at home use (though highly recommended if  you want them to last through multiple children or be used out of doors). A lot of school supply stories offer lamination machines where you can pay by the foot. However since a personal laminator can be bought for under $100 it might be worth the hassle free of being able to laminate at home. I have one just from Target and it’s been just great, though sometimes feeding it small labels can be tedious trying to make sure they don’t shift around! Of course laminate is also expensive so ask your school if they’re willing to reimburse you for making materials!
  • Book binder
    • Definitely a wish list item. I had originally gotten a  comb binding machine as a gift from an aunt (my family is pretty awesome by the way! ;) ) but I finally broke down this Christmas to get a metal cinch binder instead. Comb binders are cheaper, but do make a cheaper feeling book, and the plastic combs on several of my books have snapped due to use/age. This binder has been nice; the holes feels a bit big on smaller books but I’m very happy with it.

These are the things I use on a regular basis that have made my work easier. Obviously there are ways to get around using one or the other, but if there's a convenient gift giving occasion in your future you might want to think about dropping some hints for one of these!

Do you have any other recommendations that make your material making easier?

Tuesday, April 24, 2018

Learning how to sew

A lot of people are intimidated by the idea of sewing. I lucked out and had a mom and aunts who were really in to quilting and introduced it to me at an early age. So when I finally got the chance to begin my own classroom from scratch I obviously sewed A LOT! And because life gets in the way I still had a lot of sewing (or repairing!) to do when class actually began.

My first year I only had 6 three year olds in my room, and I was careful not to make myself too available to them, trying to encourage independence. With such a small number I had to make sure that I was pausing to do a lot of observing. To keep my watching from being too obvious I spent a lot of time sewing at one of our classroom floor tables. A lot of times the kids would wander over to see what I was making and it made for great observation practice.

I give this first year a lot of credit for turning out some great sewers in my classroom. Before I left Minnesota those original three year olds were confident kindergarteners and boy could they tackle some big projects! Here's a great example of what one accomplished with me simply planting the idea in her head and providing the materials.


Sewing her own globe was a 2 day project and took surprisingly little help from me. However there was a lot more prep work than just gathering the appropriate fabrics for her. Here's some of what we did over the three years to build up to this:
  • Needle threading
    • An obvious first step! How can you sew if you can't thread a needle? As soon as I discovered how frustrating any sewing could be for a child who couldn't thread a needle I immediately madea  stand alone activity for practice threading a needle and handling a spool of thread
  • Button sewing
    • A classic Montessori work. Over the year the children helped me sew snaps onto the classroom aprons, repair buttons that fell of pouches and even fixed a dressing frame! That's real practical life and purposeful work.
  • Embroidery
    • Tracing metal insets onto fabric and practicing the basic running stitch was hugely important for any more advanced sewing. Button sewing introduces the basic up and down motion, but embroidery expands on following a line.
  • Knot tying
    • Ok, so honestly we're still working this being an independent activity. I've tried to introduce this one using thicker thread and a big needle but still have yet to have a child who can honestly tie their own knots. Anyone care to give ME some tips?
  • Pinning fabrics
    • We had some random felt board shapes laying around that I used. The idea that  the pins need to not only go through the fabric but come back up was the trickiest part!
  • Pillow sewing
    • Puts together the idea of a running stitch, flipping fabrics inside out and then stuffing them! We also had a puppet making for those times stuffing was a bit hard to come by, lol!
  • Puzzle tracing
    • How could you make a globe with all the continents without practicing tracing them in the first place?
And of course once one student had done it others wanted to make their own globe as well! We had a line-up for that work right through the end of the school year!

I've heard that Sewing in a Montessori Classroom is a great resource. Has anyone used this book before? Or have some other sewing activities they've found have been popular?

Friday, April 20, 2018

Make it accessible

I have a lot of eye droppers in my classroom. Like a lot. Usually about 16 out and available to the children. That's not including the numerous spares I've squirrelled away in the high cupboards for the inevitable breakages.

Opening an eye dropper for polishing
Part of the reason there are so many is because I've found eye droppers to be the most practical tool to hold polish  And so not only do we always have 3 bottles out on the shelf for the three different polishing activities. (wood, metal, glass), but there are 3 identical ones tucked away in the resupply cupboard.

The resupply cupboard (or shelf like in my last classroom) holds duplicates of the consumables items in the classroom. Bottles of polish, full spray bottles for window washing, cotton balls, buttons and fabric for sewing, etc. Anything the children might use up during the course of the day and need to replenish. These are kept "out of sight out of mind" to keep a student from simply fiddling with them and making a mess. However at the same time they're in an area the children are free to access if they need more of something specific.

Obviously not everything is in this space. Most paper supplies for language, math or art are stored elsewhere due to space and are replenished by an adult before class. Or the tasting bottles which would require an extra set of 8 more eyedroppers! (and something that is usually used up due to overly silly activity anyway!).

Generally though the idea of making things accessible to the children without adult help is key to a Montessori environment. The more the children can do for themselves the less dependant they are on adults. And the easier it makes our work!

Sometimes making things accessible requires a new space, sometimes it just requires a stool to allow the child to reach an existing supply. You don't need to put out a separate apple on the child's table if you feel comfortable letting them use a stool to grab one off the counter instead.

Think about what your students or children commonly come asking you to get out for them. Is is something you would feel comfortable giving them access to? How could you put it within their reach so they could be more independent? And once you have relax in the extra time you're not wasting fetching the crayons out of the highest drawer again!
Our tasting activity

Monday, April 16, 2018

3 part cards

I had a little boy who needed to move.  I was a new guide, alone in my first classroom and desperate to keep him busy while still being able to pay attention to the other students. He also had an astonishing memory, I couldn’t believe how quickly he learned new vocabulary. So, trying to honor my training and follow his interests I made a set of classified cards of insects.

He loved them! But he couldn’t hardly sit still through a vocab lesson and quickly lost interest when I needed to step away with another student.
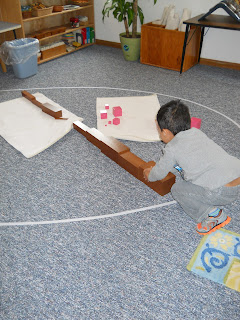
Big 'pushing' work

Enter fetching.

A simple exercise that swept through my classroom like wildfire and remains a favorite to this day! The children do it with me, an assistant, or best of all each other! One student spreads out the unlabeled cards at a table. The teacher or other students says “Bring me the Anklyosaurus”, showing the picture to match if the child isn’t sure what it is. When the first child brings it back they check that the cards match, then tuck them away in the pouches before going on to the next card. When all the cards are matched the game is over and the material is all ready to be put away.

3 part cards are the quintessential material to find online in droves. Seriously there are so many it’s overwhelming!  You can find cards for different vehicles, animals of all kinds, foods, etc. ; just about anything you’d like. I can’t imagine finding a Montessori classroom that doesn’t include these cards in some form. They’re easy to make (or cheap to buy) and are so versatile. Here’s a quick summary of the 3 part classified cards.

What are they?
The classified cards consist of printed pictures and the vocabulary that goes with them. In my AMI training the cards consisted of a single card with just the picture on it, a second card with the picture and word all in one piece, and a third card containing the picture that matched to a separate label. However for some reason EVERY set of cards I find online doesn’t have this second card. I wish I would have known to ask in my training why we actually created 4 pieces for what are called 3 part cards! Does anyone else know the reasoning behind it?


Why do we use them?
The purpose of the classified cards is to help children build up their vocabulary and help categorize objects. For example there may be set of vegetable cards and fruit cards in the classroom to help children begin to distinguish which items belong to each category.

How do we use them?
Traditionally the cards are presented in a three period lesson for the children, exploring to see which words they already know and which ones they can learn.  Here's a great summary of the Three Period Lesson. Above I explained how my first classroom evolved to have the cards be used mainly as a fetching/memory game.

After the students get better at the vocab it’s often fun to play the description/definition game. Spreading out the cards at a table or mat give some clues about which object you’re thinking about without using its name. Ex. “I’m thinking of something you might use to make a smoothie” “Blender!”

Tips for making the cards
IMG_0121
Note the pink color coding to
help keep this set from getting
 mixed up with other animal cards.

  1. Color code them!
    • Print the pictures on regular paper, then glue them to colored cardstock before laminating. So much easier than drawing dots on the back and it makes them sturdier too!
  2. Build a template
    • I made a template in Word that simply allowed me to find the pictures I needed, insert them and quickly type the words underneath. Using a template made it not only faster to create new sets of cards, but insured they were all the same size to fit in my pouches.
  3. Sew universal pouches
    • Ideally each set of cards has a pouch that shows what is inside (ex. fabric with different birds on it for bird cards) but let’s be honest and say that’s just not realistic. Years ago I invested in some fabric patterns that went nicely together, and made 5 sets of pouches that were identical and fit the cards sized in my template. Now when it’s time to rotate cards I can simply take the old ones out and put new ones in.
  4. Cut cards that are easy to tell apart
    • Like I said, I was taught to make 3 copies of the picture and a matching label so there are actually 4 parts. After having numerous spills and trying to sort of cards I realized I’d missed something obvious that would make my life easier. Rather than trimming the 3nd card to be a square to go with the label I left the space where the word should go. This make it so there was always room for the children to place the label, and made sorting easier. Simply sort the cards into big and little; then separate the big cards into those with words and those without. If you’re going to make cards the AMI way I really recommend using this trick to save yourself some headaches.
Have you found any other ways to use classified cards in the classroom or at home? Please share them with us!

Friday, April 13, 2018

Welcome!


Maria Montessori referred to adults in the Children's House as Guides rather than teachers. The idea being that they were not teaching the children, but rather guiding them in a direction that they could discover the information for themselves
.
However as one of those Guides I've struggled to find someone to guide me after completing my training! The majority of websites about Montessori are either informational or about parents sharing their experiences following the Montessori principles with their own children. Now I think all of those are great, the more the word gets out about Montessori the better!

However, the blogs that speak to me the most are those published by other Guides. Those who not only practice the theory in their daily lives, but also know the reasons behind why we do what we do. These are the ones that most often inspire me to create something new to share in my classroom. They give me ideas of little tweaks that make things run just that much smoother.

My hope is to add to this small pool, to give others working in classrooms (and at home!) more resources to draw from. After all, we prepare the environment for the children, giving them the tools to learn what they need. Why not do the same for those attempting to guide them in the write direction?

Onward!

Thursday, April 12, 2018

A change of direction

For those scrolling through older posts this is where a shift in direction happens. Overall a pretty subtle one, but still a different direction.

I found it hard to consistently tell tales about what happened in the classroom as I got more students and had several very challenging ones that I didn't want to write about over and over again. Now I'm in a new state, a new school, a new classroom...and I"m still not sure I can consistently share what's going on in the classroom.

However over the years I've found that my real passion about the classroom is figuring out how to craft, beautiful and engaging materials to share with the children. And as time has gone by I've been disappointed again and again over the lack of quality resources for Montessori guides. Between these two things I want to take this blog in a new direction.

So, sorry mom but there won't be quite so many cute kid stories. But I'm sure they'll sneak in from time to time!